To fry cheese in a pan:
- Heat a non-stick skillet over medium heat (Around 375 to 450 degrees Fahrenheit (190 to 232 degrees Celsius)).
- Add a small amount of cooking oil to coat the pan.
- Place cheese slices or cubes in the pan, leaving space between each piece.
- Optional: Add herbs, spices, or a light breading for flavor and texture.
- Fry for 1-2 minutes on each side until golden brown.
- Use a spatula to flip the cheese carefully.
- Transfer the fried cheese to a plate lined with paper towels to absorb excess oil.
- Serve immediately while hot and gooey. Enjoy it on its own or with dipping sauces.
You can also fry Panela Cheese that makes a crispy and delicious delight whether served with other items or not.

Introduction to How to Fry Cheese In A Pan
Think about how awesome it is when you bite into fried cheese—crispy outside, gooey inside. It’s a taste that everyone loves, no matter where you’re from. Whether it’s mozzarella sticks or some other kind, Fried cheese is like a comfort food that makes you feel happy.
Guess what? Making this delicious treat at home is way easier than you might think. You only need a few steps and a bit of creativity. From picking the right cheese to getting the breading and frying just right, making your own fried cheese is like a fun kitchen adventure.
In this guide, we’ll explore the simple steps and tricks to help you make excellent fried cheese at home. It’s all about keeping things easy while enjoying the cheesy goodness.
So, get ready to make your kitchen a place where simple meets tasty, and each bite feels like a party with homemade fried cheese.
How to Fry Cheese in A Pan?
Frying cheese in a pan is a delicious way to create crispy and golden-brown edges while maintaining a gooey and melty center. Here’s a simple guide on how to fry cheese in a pan:
Ingredients:
- Cheese slices or cubes (cheddar, mozzarella, or your preferred melting cheese)
- Cooking oil (vegetable oil, canola oil, or olive oil)
- Optional: Herbs, spices, or breading for additional flavor and texture
Instructions:
Choose the Right Cheese:
Choose a cheese that melts nicely, like cheddar, mozzarella, or provolone. You can either use slices or cut it into small, bite-sized cubes.
Prepare the Cheese:
If you’re using cheese slices, keep them chilled until just before cooking. If using cubes, make sure they are relatively uniform in size for even frying.
Optional: Add Flavor or Coating:
Sprinkle herbs, spices, or a light breading onto the cheese for additional flavor and texture. You don’t have to do this step compulsorily, but it can make things nicer.
Heat the Pan:
Put a non-stick skillet or frying pan on the stove with medium heat. Add some cooking oil to cover the pan’s bottom.
Preheat the Oil:
Allow the oil to heat up, but avoid reaching the smoking point. A medium heat setting is generally sufficient.
Place the Cheese in the Pan:
Gently put the cheese slices or cubes in the hot pan, making sure there’s room between them. Be careful not to crowd the pan.
Fry Until Golden Brown:
Allow the cheese to fry on each side for 1-2 minutes until it turns golden brown. Keep a close eye on it to prevent burning.
Use a Spatula:
Gently flip the cheese using a spatula. Be cautious, as melted cheese can be hot and sticky.
Remove from the Pan:
Once both sides are golden and crispy, transfer the fried cheese to a plate lined with paper towels to absorb excess oil.
Serve Immediately:
Enjoy the fried cheese while it’s hot and gooey. It can be served on its own, with dipping sauces, or as a topping for salads, burgers, or sandwiches.
Experiment with Variations:
Get creative by trying different cheese varieties, adding unique seasonings, or experimenting with dipping sauces for a personalized touch.
Remember, the key to successful fried cheese is balancing a crispy exterior and a melty interior. Change the heat and cooking time according to what you like and the kind of cheese you have.

Choosing the Right Cheese
Discussing the Best Melting Cheeses for Frying:
When frying cheese, choosing the right variety is important to ensure that perfect gooey, melty texture. Not all cheeses have the same melting properties, so consider these options for achieving that ideal consistency:
Mozzarella:
Opt for mozzarella, a classic choice known for its exceptional melting properties. Its mild flavor and stretchy texture make it perfect for frying.
Consider using fresh mozzarella for a creamier texture or low-moisture mozzarella for a firmer result.
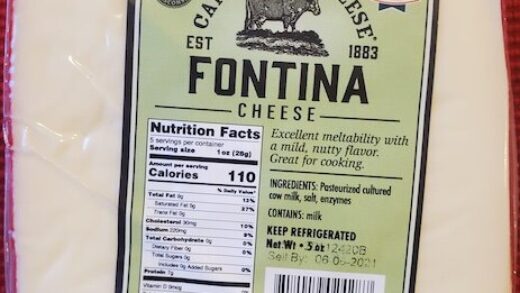
Fontina:
If you enjoy a rich and buttery taste, go for Fontina. This semi-soft cheese melts well with a smooth consistency, making it a delicious option for frying.
The nutty undertones of Fontina add a flavorful dimension to the melted cheese.
Gruyère:
Gruyère, a firm Swiss cheese with a distinct nutty flavor, is an excellent choice for frying. It melts smoothly and evenly, adding a savory element to the melted cheese.
Enjoy the nuttiness of Gruyère that complements various dishes.
Cheddar:
For a sharp and tangy flavor, consider cheddar cheese. Opt for medium or sharp cheddar for a more pronounced taste when frying.
Cheddar adds a bold flavor to the melted state, making it a versatile option for various recipes.
Provolone:
If you prefer an Italian semi-hard cheese, provolone is a great option for frying. It melts well, has a mild, creamy taste, and works particularly well for achieving a smooth texture.

Credit: YouTube.com
Choose aged provolone for a more robust flavor profile.
Options for Slices or Cubes:
Slices:
Sliced cheese is the way to go when you want quick and even melting. It’s perfect for sandwiches, burgers, or any dish where a uniform melt is essential.
Consider popular choices like American, Swiss, or cheddar for sliced cheese.
Cubes:
If you’re looking for versatility, cubed cheese is a great option for skewers, salads, or bite-sized snacks. It provides a varied texture experience, with some parts being more melted and gooier while others maintain a firmer consistency.
Mozzarella, cheddar, and Gruyère work well in cube form.
In the end, the cheese you pick relies on what you like and the dish you’re making. Try out various slices of cheese to find your top pick for frying, whether you want gooey sandwiches, crunchy cheese bites, or tasty melted toppings.
Prepping the Cheese
Keeping Your Slices Chilled or Making Your Cubes Uniform in Size:
For Slices:
Make sure to keep your slices chilled before frying. This helps them hold their shape and melt evenly. Cold slices are less likely to lose their form and turn into a gooey mess too quickly.
For Cubes:
If you’re going for cubes, aim for uniformity in size. This ensures that each piece cooks evenly. Uniform cubes mean a consistent melting experience, giving you that perfect balance of crispy and gooey.
Optional: Boosting Flavor with Herbs, Spices, or Breading:
Herbs and Spices:
Don’t hesitate to add extra flavor! Sprinkle some herbs or spices on your cheese before frying. It’s an easy way to give your melted goodness an extra kick. Try simple options like oregano, garlic powder, or a pinch of paprika.
Breading (Optional):
Want to add a crispy layer? Consider coating your cheese in breadcrumbs or a light batter. This not only enhances the texture but also adds another layer of flavor. It’s an optional step but can take your fried cheese to the next level.
Remember, keeping things cool and uniform ensures a smooth melting process. And if you’re feeling adventurous, play around with herbs, spices, or breading to take your fried cheese to new heights. Enjoy your cheesy culinary adventure!
Preparing the Pan
Selecting the Right Skillet or Frying Pan:
For Slices:
When it comes to frying cheese slices, go for a non-stick skillet. This makes it easier to flip and prevents the cheese from sticking to the pan.
Choose a pan size that accommodates the number of slices you’re frying, ensuring they have enough space to melt without overcrowding.
For Cubes:
If you’re frying cheese cubes, a cast-iron skillet works well. It distributes heat evenly, helping each cube melt uniformly. Plus, it adds a delicious, crispy layer to the cubes.
Ensure the skillet is appropriately sized for the number of cubes you’re frying to avoid overcrowding.
Properly Heating the Pan with Cooking Oil:
For Slices:
Put a thin layer of cooking oil in the skillet and warm it up over medium-low heat. You don’t need much, just enough to cover the pan and prevent sticking.
Heat the oil until it shimmers, indicating that it’s hot enough for frying. Be cautious not to overheat, as this can lead to uneven melting.
For Cubes:
Use enough cooking oil to cover the bottom of the skillet when frying cubes. Heat the oil to around 350°F over medium heat, ensuring it becomes hot but not smoking.
Test the temperature by dropping a small part of bread into the oil; if it browns in approximately 60 seconds, the oil is ready for frying.
Remember, the right pan and properly heated oil are crucial for achieving that perfect melt. Whether you’re frying slices or cubes, these steps will help you create a delightful, gooey experience. Happy frying!
The Frying Process
Placing Your Cheese in the Pan with Proper Spacing:
For Slices:
Lay your cheese slices in the pan, ensuring they have enough space between them. This prevents them from sticking together as they melt.
Keep an eye on their edges – when they start to turn golden, it’s a sign they’re ready for flipping.
For Cubes:
Gently place your cheese cubes in the skillet with adequate spacing. This gives each cube enough heat to melt and ensures a crispy exterior.
Maintain the spacing to avoid the cubes merging into one big cheesy blob.
Monitoring Heat and Avoiding Overcrowding:
For Slices:
Keep the heat at medium-low to prevent the cheese from cooking too quickly. This allows for a gradual melt and a gooey texture.
Avoid overcrowding the pan; this helps maintain an even temperature and ensures each slice gets the attention it deserves.
For Cubes:
Moderate heat is key for frying cheese cubes. Overcrowding can lead to uneven cooking, so make sure there’s enough space between each cube.
Be patient and let them cook at a steady pace, ensuring a perfect blend of crispy and melted goodness.
Flipping the Cheese for Even Frying:
For Slices:
Once the edges of your cheese slices turn golden and the bottom is crispy, it’s time to flip. Use a spatula to turn them gently and cook the other side until it reaches the desired level of crispiness.
For Cubes:
Turn your cheese cubes using tongs or a spatula when one side becomes golden brown. This ensures that all sides get equal heat for that even, melty perfection.
Keep flipping until all sides are golden and crispy.
Remember, patience is key during the frying process. Whether it’s slices or cubes, proper spacing, and heat management contribute to a deliciously gooey outcome. Enjoy your crispy, melted cheese creation!
Achieving the Perfect Golden Brown
Determining the Optimal Frying Time (1-2 Minutes per Side):
For Slices:
Aim for a frying time of 1-2 minutes per side. This ensures that the cheese slices melt to a gooey consistency without becoming too crispy or overcooked.
Adjust the time based on your stove’s heat level and the thickness of the slices.
For Cubes:
Similar to slices, 1-2 minutes per side is a good benchmark for cheese cubes. This timeframe allows for a crispy exterior while maintaining a delightful, melted interior.
Keep an eye on the cubes and adjust the time as needed for your desired level of golden brown.
Using Visual Cues to Gauge Doneness:
For Slices:
Look for a golden-brown color on the edges and bottom of the cheese slices. This visual cue indicates that they are ready to be flipped.
When both sides are golden brown, your slices are likely perfectly melted inside.
For Cubes:
Observe the cubes as they fry; when one side achieves a golden-brown color and crispy texture, it’s time to flip them.
Use the visual cues on all sides of the cubes to gauge their overall doneness. A consistent golden-brown appearance ensures a uniform melt.
Remember, achieving the perfect golden brown requires careful attention to the frying time and visual cues. Keep a close eye on your cheese, and you’ll be rewarded with a crispy, golden exterior and a gooey, melted interior. Enjoy your delicious creation!
Handling Melted Cheese
Cautionary Notes on Dealing with Hot and Sticky Melted Cheese:
Temperature Awareness:
Be cautious when handling melted cheese; it can be extremely hot. Allow it a moment to cool slightly before attempting to touch or move it.
Use utensils like spatulas or tongs to manipulate the cheese rather than your hands to avoid burns.
Sticky Situation:
Melted cheese can get sticky, so be mindful of surfaces it may come in contact with. Use parchment paper or a non-stick surface to prevent the cheese from adhering to your cooking tools or plates.
If using your hands for any reason, consider lightly oiling them to minimize sticking.
Tips for a Smooth Flipping Process:
The Right Tool:
Choose the appropriate utensil for flipping, such as a thin spatula for slices or tongs for cubes. This helps maintain the shape and prevent the cheese from breaking apart.
Slide the spatula or tongs gently under the cheese to lift and flip it without causing too much disturbance.
Timing is Key:
Wait for the optimal moment to flip your melted cheese. Trying to flip too early may result in a messy situation while flipping too late can lead to uneven cooking.
The perfect time to flip is when you observe a golden-brown color on the bottom and edges, indicating that the cheese has achieved a desirable level of crispiness.
Smooth Motion:
Do it with a smooth and controlled motion to avoid splattering hot cheese when flipping. Quick, jerky movements can lead to a less-than-ideal melt and may cause the cheese to break apart.
If you’re dealing with particularly gooey cheese, consider using two spatulas for added support during flipping
.
Draining Excess Oil
Transferring Fried Cheese to a Paper Towel-Lined Plate:
Paper Towel Absorption:
Once your cheese is perfectly fried, transfer it to a plate lined with paper towels to absorb any excess oil.
Allow the cheese to rest on the paper towels for a brief moment to ensure effective oil drainage.
Single Layer Placement:
Arrange the fried cheese in a single layer on the paper towels. This prevents the pieces from sticking together and helps maintain their individual crispiness.
Gently pat the top of the cheese with another paper towel to absorb any additional surface oil.
Ensuring a Perfect Balance Between Crispy and Gooey:
Prompt Serving:
Serve the fried cheese promptly after draining. This ensures that it retains its optimal balance between crispy and gooey textures.
Delayed serving may lead to a loss of crispiness, especially if the cheese absorbs excess oil.
Testing Texture:
Check the texture of the first piece you serve. It should have a delightful, crispy exterior while maintaining a gooey, melted interior.
Adjust your frying or draining process for subsequent batches to achieve the desired balance if needed.
Consideration for Sauces:
If serving with sauces, keep in mind that they can add moisture. Draining excess oil becomes even more crucial to maintaining the fried cheese’s crispy texture.
Serve sauces on the side or drizzle them sparingly to avoid compromising the ideal balance.
By transferring your fried cheese to a paper towel-lined plate and paying attention to the timing of serving, you ensure that excess oil is effectively drained and your dish maintains the perfect equilibrium between crispy and gooey. Enjoy your delicious creation!

Serving Suggestions
Enjoying Fried Cheese on Its Own:
Simple Pleasure:
- Sometimes, the best way to savor the goodness of fried cheese is to enjoy it on its own. Let the crispy exterior and gooey interior take center stage.
- Serve it as a delightful snack or appetizer for a straightforward and satisfying experience.
Pairing with Complementary Sauces or Dips:
Classic Marinara:
Pair your fried cheese with a classic marinara sauce. The tanginess of the tomato sauce complements the richness of the melted cheese.
Dip each piece for a classic and timeless combination.
Garlic Aioli:
Elevate the experience with a garlic aioli. The creamy, garlicky goodness adds a flavorful dimension to the crispy exterior of the fried cheese.
Experiment with different aioli flavors for a personalized touch.
Sweet and Spicy:
Try a sweet and spicy sauce for a unique twist. A honey mustard or a sweet chili sauce can add a delightful contrast to the savory and gooey cheese.
Depending on your preference, drizzle or dip for a burst of flavors.
Creative Uses as Toppings or Additions to Dishes:
Sandwiches and Burgers:
Use fried cheese slices as a delicious addition to sandwiches or burgers. The crispy texture can elevate the overall mouthfeel of your favorite sandwich creations.
Salad Toppings:
Cube the fried cheese and use it as a crunchy topping for salads. The warm, melty cubes can add a rich and savory element to your fresh greens.
Pizza Topping:
Break or cut the fried cheese into smaller pieces and use it as a unique pizza topping. The combination of crispy and gooey cheese can be a delightful surprise.
Brunch Delight:
Incorporate fried cheese into your brunch by serving it with eggs, bacon, or a breakfast sandwich. The rich, melted cheese can add a comforting touch to your morning meal.
Remember, the versatility of fried cheese opens up a world of possibilities. Whether you choose to enjoy it on its own, with complementary sauces, or as a creative addition to dishes, the crispy and gooey delight is sure to be a crowd-pleaser. Bon appétit!
Troubleshooting Tips
Common Issues Like Burning or Uneven Frying:
Burning Issues:
If your cheese is burning too quickly, lower the heat. High temperatures can cause the cheese to burn before achieving the desired melt.
Ensure that you’re using an appropriate cooking oil with a high smoke point to prevent both burning and the development of off-flavors.
Uneven Frying:
Uneven frying can occur if the heat isn’t distributed uniformly. Rotate the cheese pieces during cooking, or consider using a pan with even heat distribution.
For slices, ensure they are spaced properly, and avoid overcrowding for cubes to promote even cooking.
Adjusting Heat and Timing Based on Cheese Type:
Temperature and Cheese Type:
Different cheeses have different melting points. Adjust the heat based on the type of cheese you’re frying. Lower heat is generally suitable for cheeses that melt quickly, while higher heat may be needed for firmer cheeses.
Keep an eye on the first batch to gauge the optimal heat and timing for subsequent batches.
Timing Adjustments:
Pay attention to the thickness of the cheese slices or cubes. Thicker pieces may require slightly longer cooking times, while thinner ones may cook faster.
Adjust the frying time accordingly to balance crispy and gooey textures perfectly.
Experimentation:
Don’t hesitate to experiment with a small amount of cheese first to determine the ideal heat and timing for your specific setup.
Keep notes on your adjustments so you can replicate successful frying in the future.
Remember, troubleshooting during the frying process is a natural part of perfecting your technique.
By addressing common issues like burning or uneven frying and adjusting heat and timing based on the type of cheese, you’ll gradually master the art of creating the perfect fried cheese. Happy frying!
FAQs
Can I use any type of cheese for frying?
For optimal results, it’s best to use cheeses that melt well, such as cheddar, mozzarella, or provolone.
Should I keep the cheese cold before frying?
Yes, it’s recommended to keep cheese slices chilled until just before cooking to maintain their shape during frying.
Can I fry cheese without any added seasonings or breading?
Absolutely, frying cheese without additional seasonings or breading can result in a deliciously simple and gooey treat.
How much cooking oil should I use in the pan?
Use enough oil to coat the pan’s bottom, ensuring even heat distribution, but avoid excess that might make the cheese too greasy.
Is it necessary to flip the cheese while frying?
Yes, flipping the cheese ensures even browning on both sides. Use a spatula and handle with care, as melted cheese can be hot.
What’s the best way to determine when the cheese is done frying?
Fry each side for 1-2 minutes or until it turns golden-brown. Visual cues are key to determining doneness.
Can I refrigerate leftover fried cheese?
While it’s best enjoyed fresh, you can refrigerate leftovers and reheat them, though the texture may differ slightly.
Can I fry cheese in advance for a party or gathering?
While best served fresh, you can partially fry the cheese in advance and finish the process just before serving for a crispier texture.
Conclusion
In conclusion, mastering the art of frying cheese involves carefully balancing achieving a golden-brown exterior and a gooey, melted interior.
From selecting the right cheese and preparing the pan to handling the melted cheese and serving it in creative ways, each step contributes to a delightful culinary experience.
By being mindful of troubleshooting tips and adapting techniques based on the type of cheese, you can create a crispy and gooey masterpiece that satisfies both the palate and the senses.
So, embrace the process, savor the results, and enjoy the versatile and comforting world of fried cheese. Happy cooking!

